Wondering how to create a flash briefing skill? Whether you want to promote your business, share your hobby, or raise awareness for your non-profit, now is the time to create a flash briefing. In this episode, Teri reveals the step by step instructions on how to create a flash briefing skill for Amazon Alexa… with no coding required!
Looking for a complete course on how to create your own flash briefing, including everything from content creation and technical workflows to marketing and a launching plan, AND access to me and fellow classmates and alumni in a private community? Click Here!
Create a Flash Briefing Skill
Flash briefings are the new podcasts… as least as far as I am concerned! If you are interested in getting your message out to the world, in my opinion there is simply no better way than to create a flash briefing. In my experience, good quality flash briefings are being consumed at a rate equal to or greater than that of podcasts. For example, 4 months after launching the Alexa in Canada Podcast, I was getting approximately 200 people listening to each episode on the day it was released (and less on the other days of the week). Compare that to the Voice in Canada Flash Briefing: after only 2 weeks, I was already getting 300 listeners every single day!
When it comes to audio content, flash briefing skills are the new frontier. This is the next big thing in audio, so my suggestion is don’t wait any longer – go create a flash briefing now!
Whether you want to promote your business, share your passion for a hobby, or raise awareness for your non-profit organization, now is the time to create a flash briefing. Below I outline the simple steps on how to create a flash briefing that anyone can follow. And there is no coding required!!
Step 1: Decide on Your Topic
This one may seem like a no-brainer, but before you begin to create a flash briefing skill it is really important to think carefully about your topic, and what you will be talking about. The most successful flash briefings are the ones that consistently put out great content. You have to be willing to commit to create a flash briefing episode on a daily basis. So, make sure that you have enough to say about your topic to make a daily show that is engaging, exciting, and valuable for your audience.
Can you imagine yourself doing this 365 days from now and still going strong with fresh ideas? Think about your general topic and then brainstorm (and write down!) at least 30 individual episode topics for your show. To help you out, here are a couple of subtopics to get the creative juices flowing: news, reviews, tips, tricks, deals, scores, updates, seasonal items…. the list really goes on and on, limited only by your imagination.
Step 2: Record an Episode (or a few!)
Are you cut out for this? Well, before you dive into setting up your Flash Briefing hosting service and your Amazon Developer account (don’t worry, both are really easy to setup!), try recording an episode for your first Flash Briefing and see how you like it. You could just use your mobile phone and get going, but keep in mind that the higher quality the audio, the more polished and professional your show will be!
Here is the audio equipment that I recommend. It’s relatively inexpensive and works great! It is excellent value for the money and this is what I used (and still use!) to create my top-rated Flash Briefing skill:
- Audio-Technica ATR2100-USB/XLR Cardioid Dynamic Microphone
- NEEWER Adjustable Microphone Suspension Stand
- On Stage MY420 Studio Microphone Shock Mount
- Dragonpad Pop Filter Studio Microphone Wind Screen
So, consider using some good audio equipment and a program such at GarageBand or Audacity for the recordings. Once you decide how you will record the episodes, go ahead, push record, and create your first flash briefing episode! Even better, get ahead of schedule and pre-record a week’s worth of episodes.
Also, keep in mind a few key points:
- Make your flash briefing episodes short. I suggest keeping your audio files under a few minutes. I aim for approximately 2 minutes with each of my episodes.
- The main purpose of each audio episode should be to provide informative and entertaining content to your listeners. Try to avoid advertising, plugs, or promotions.
- Use high-quality audio formats. Amazon suggests using the MP3 format with a bit rate of at least 256kbps (this is a setting you choose when exporting your file from your recording software).
- Make sure your audio is free of distracting background or other noises.
- And finally, try to keep a consistent volume within each episode and between episodes.
Step 3: Decide Where you Will Host your Audio Files
So you got your first recording under your belt! Awesome job. That’s the first big step to create a flash briefing. Now what? Well, we need a place to upload those audio files so that when listeners ask Alexa for your flash briefing, she has a reliable, simple place to find them.
There are lots of ways to host your audio files, some more complicated than others, but I promised that this would be simple and coding-free, didn’t I?! Over the years, I have tried a number of audio hosting services and I now highly recommend Pippa.io. This is because they have made it extremely easy to setup a flash briefing, particularly because there is no coding or programming required. Simon Marcus, the CEO of Pippa.io, joined me on my podcast to discuss Pippa.io and how he, his team, and I developed the flash briefing feature in consultation with each other.
Note that in the spirit of full transparency, I am an affiliate for Pippa.io because I believe they offer such an incredible service. If you choose to use them, make sure to use the coupon code “alexaincanada” (without the quotes) to get a free $25 Amazon Gift Card when you sign up for an annual plan. Click here to go to Pippa.io
Regardless of who you choose to host your audio, make sure that the host can provide a publicly-accessible RSS or JSON feed, secured with an https URL. Pippa does this all automatically!
Once you have setup your audio host, follow their instructions to create a flash briefing show and upload your audio files.
Step 4: Register as an Amazon Developer
The next step to create a flash briefing skill is to signup for an Amazon Developer account. This is completely free, but it is absolutely required. This is where you will submit your flash briefing to Amazon so Alexa knows that your show exists. Go to https://developer.amazon.com/login.html and create a free account.
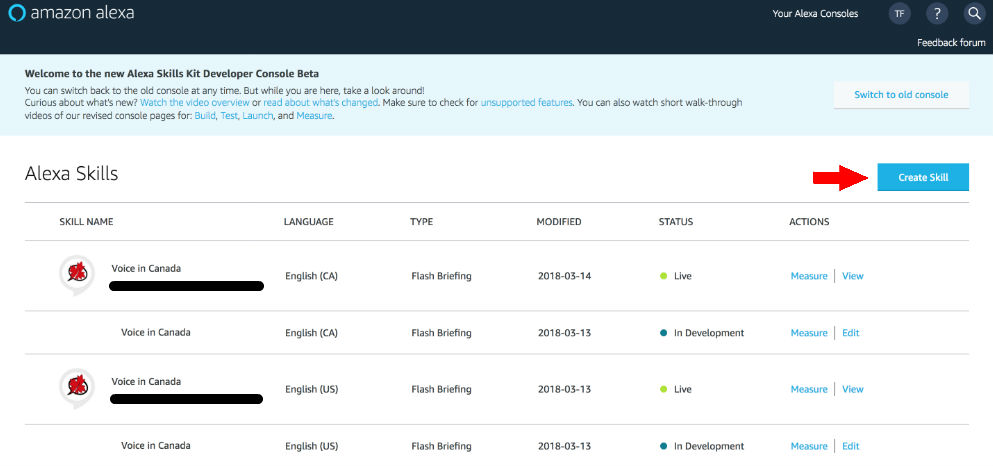
Step 5: Create a New Skill in the Developer Console Beta
- Click on Create Skill.
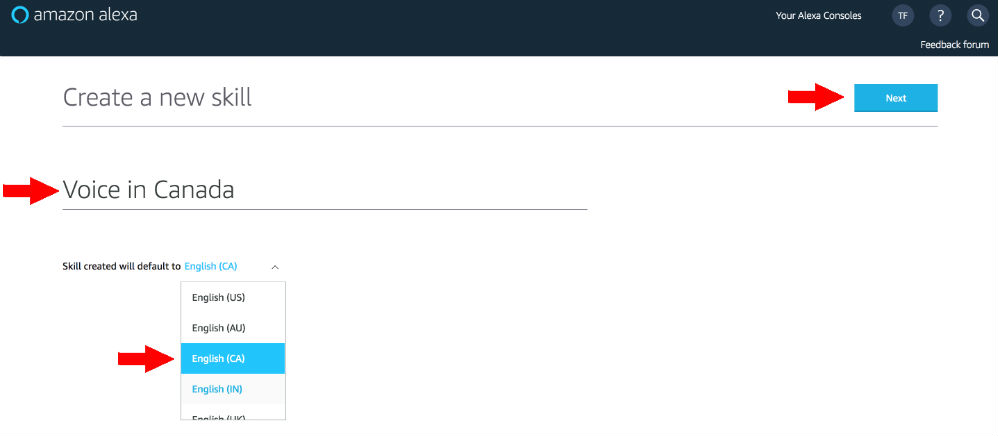
- Enter the Name for your skill. This name will be seen by users in the Alexa App. Make sure this name does not imply sponsorship by Amazon, or infringe on the copyright, trademark and publicity rights of a third party. Click Next.
- In the Language drop-down, choose the language for your skill. A Flash Briefing skill targets a single language and you cannot change the language once you select it. To create a flash briefing for the Canada Amazon store, (i.e. Amazon.ca) choose English (CA). To create a flash briefing in the American Amazon Skill Store (i.e. Amazon.com), choose English (US). Likewise, if you want your flash briefing in another country, choose the appropriate language.
- Click Next.
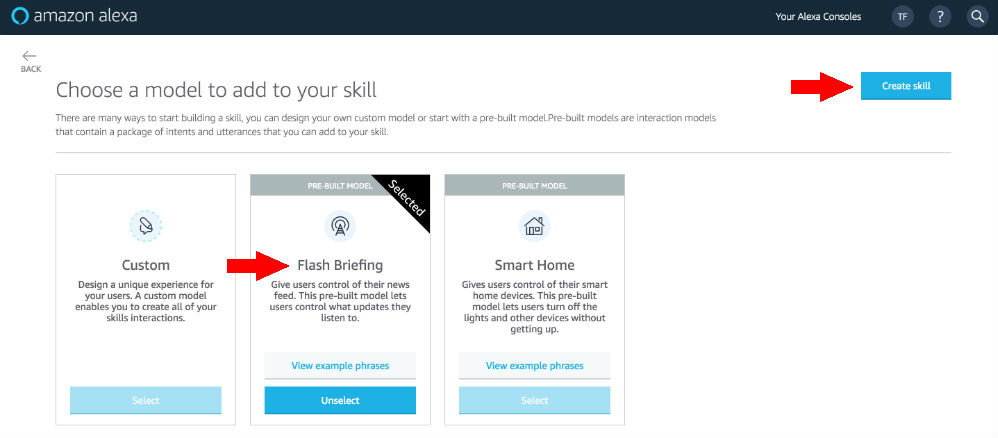
- Select the Flash Briefing Pre-Built model.
- Finally, click Create Skill. This will automatically take you to the Build tab (seen at the top left of the screen).
Step 6: Set up an Error Message
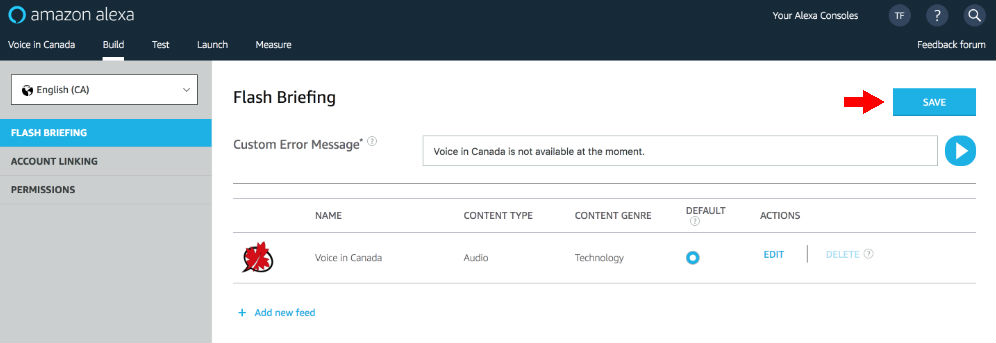
Enter a Custom Error Message. Alexa says this message to the user if there are any problems retrieving the flash briefing for some reason. Hopefully, your audience will never hear this! Just type something like, for example, “Voice in Canada is not available at the moment.” There is a 100 character maximum for this phrase. Make sure this message is in the language you chose for your skill. This means if you are creating an English Flash Briefing skill, your error message should be in English.

Step 7: Add One or More Flash Briefing Feed(s)
When you create a flash briefing skill, you have the option to setup multiple feeds of text or audio content. Typically each feed focuses on a specific genre of content such as sports or local news. Alexa will read a text feed, called text-to-speech (TTS) or play recorded audio files. One feed must serve as the default feed, which is always turned on for the skill. The remainder of the feeds for a flash briefing can be turned on by the user that enables your skill. Most flash briefings only have 1 feed, but you technically could have multiple feeds covering different sub-topics all under one umbrella flash briefing skill.
Here are the instruction on how to add a feed. For most flash briefings you would only have to do this once (i.e there would just be the single default feed). If you have multiple feeds, repeat the following steps or each feed.
- Click Add New Feed.
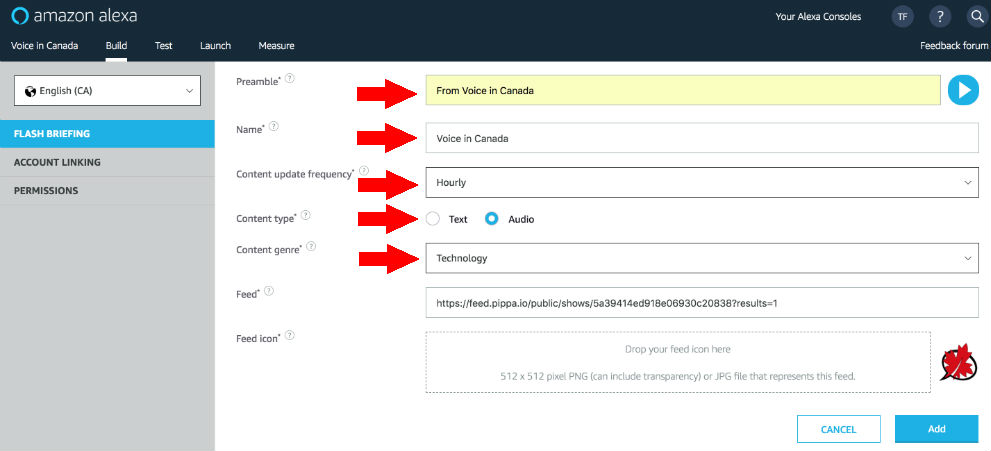
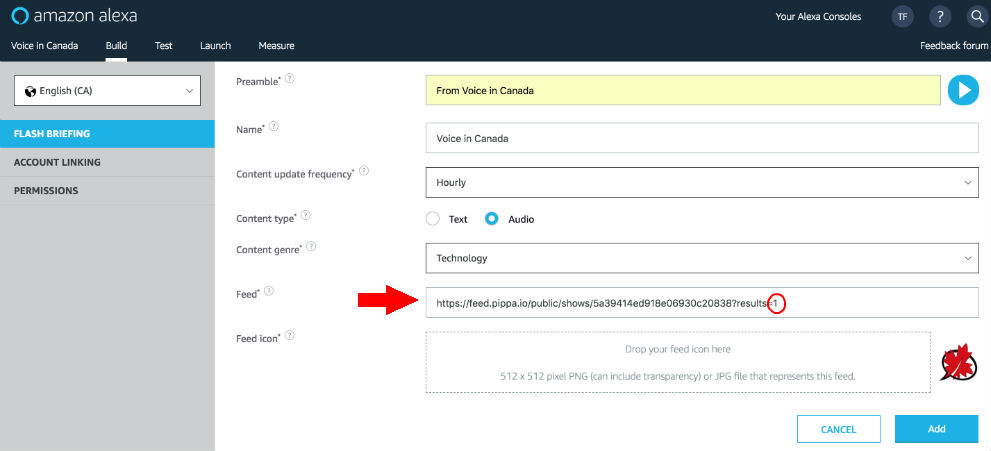
- Enter a Preamble Message. This is a short introduction for the feed that Alexa reads to the user before the actual audio is played. It should start with “In” or “From”. For example, “From Voice in Canada…”. The preamble is limited to 70 characters, and should be in the same language you chose for your skill.
- Enter a Name for the particular feed – choose a name that is unique to this skill and helps users determine the content. For flash briefings with one feed, this feed name can be the same as your skill name. For those with multiple feeds choose something that describes the feed. For example, “Developer news.”
- Choose the Content update frequency. This is how often the feed will have new content. You can choose: hourly, daily, or weekly. I recommend daily (but remember, you have to commit to doing it daily!).
- Choose your Content type. This is the format of the feed content. You can choose Text or Audio. I recommend audio, which is an actual audio file that you record. The rest of these instructions show how to setup this type of feed. (FYI: The other option – text – is to have Alexa read the text in her voice.)
- Select the best description of your Content genre from the drop-down box.
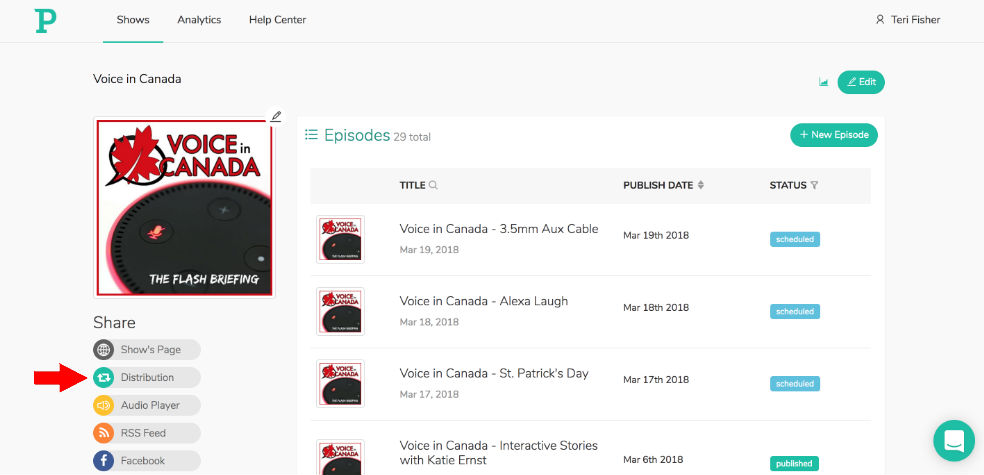
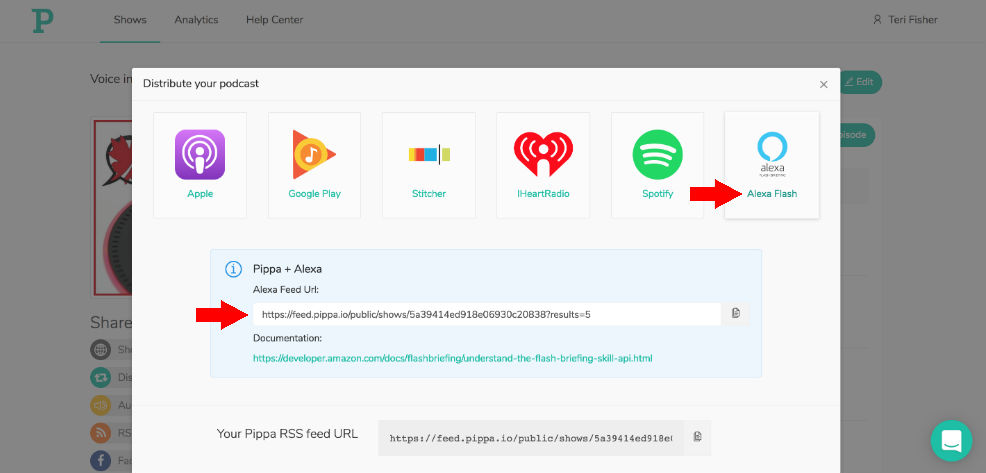
- Now, the moment of truth… it’s time to identify the location of your audio files, i.e. your Feed. As mentioned previously, there are lots of different ways to host your audio files. Whatever you decide to do, the feed field is where you paste the link (i.e. the JSON or RSS URL) to your audio files. The URL cannot be any destination which requires the user to login. Here is where Pippa.io really makes things simple! Remember when you setup your audio host with Pippa? Well, go back to your account, click on your flash briefing show, and then click on Distribution. Click on the Alexa Flash icon. Now simply copy the Alexa Field URL and past it into the Feed field on your Amazon Developer account. The last thing to do is edit the number at the end of the link – it can be any number from 1 to 5. This number tells Amazon how many of the latest audio files to play when a user requests your flash briefing. For most cases I suggest setting this at 1 so Alexa plays only the single most recent audio file at any given time. And that’s it! Easy, huh?!
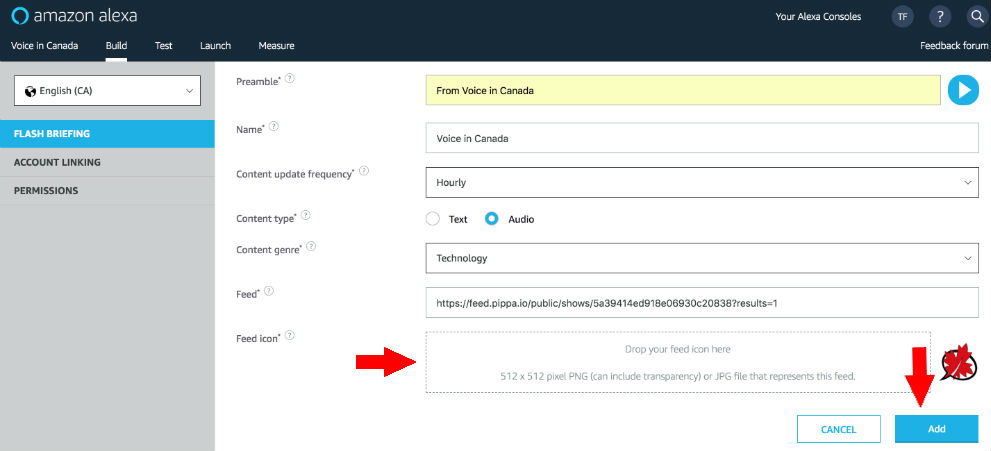
- Now choose your Feed icon. This is a 512 x 512 pixel PNG (can include transparency) or JPG file that represents your feed. This image will display in the Alexa App. Again, make sure that the icon does not imply sponsorship by Amazon, or infringe on the copyright, trademark and publicity rights of a third party.
- Click Add.
- Click Save.
- Optional: Repeat these steps for each feed you provide for the skill. The first feed you add will automatically be marked as the default feed. If you add more feeds, you can choose which feed is the default, by selecting it in the Default column.
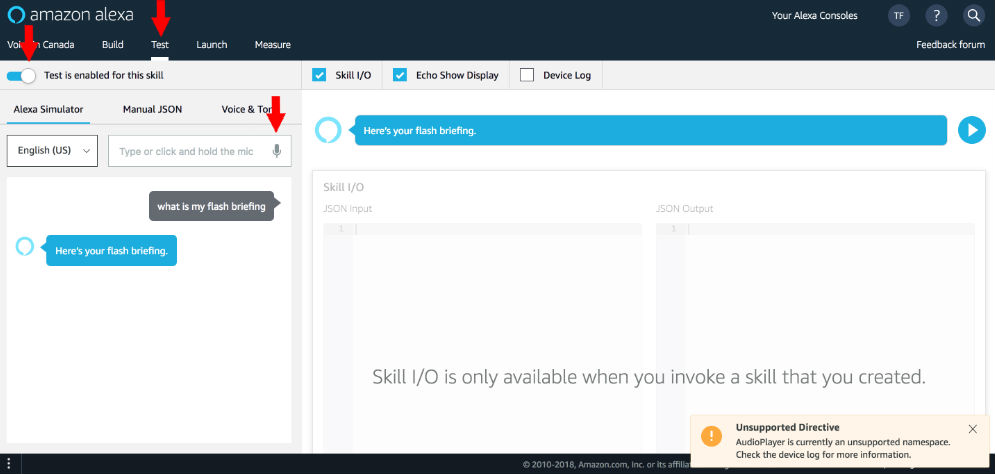
- Click the Test tab at the top left of the screen when you are finished adding feeds and are ready to test your skill.

Step 8: Test Your Flash Briefing Skill
The next step in skill creation is to test the Flash Briefing skill on your Alexa-enabled device. You must have this device registered to the same account as your developer account for your skill to display.
- On the Test tab in the developer portal, move the the slider in the top left corner to Enable to begin the testing.
- Click and hold the microphone icon and say,”Alexa, what’s my Flash Briefing?” or “Alexa, what’s the news?” Alexa should respond with “Here is your flash briefing.”
(Don’t worry if you get an “Unsupported Directive. AudioPlayer is currently an unsupported namespace. Check the device log for more information” error message. Just ignore it!)
Now go to your Alexa App > Skills and find your skill by applying the Your Skills filter, and enable the skill. - After you enable your skill, you can ask Alexa, “Alexa, what’s my Flash Briefing?” or “Alexa, what’s the news?” Your content should play or be read by your Alexa device.
- If you have multiple feeds, you should enable all of them and test them with your Alexa device or app.
- When you have finished testing your flash briefing and you are ready to move on, click the Launch tab in the upper left of the screen.
Step 9: Provide Launch Information for your Skill
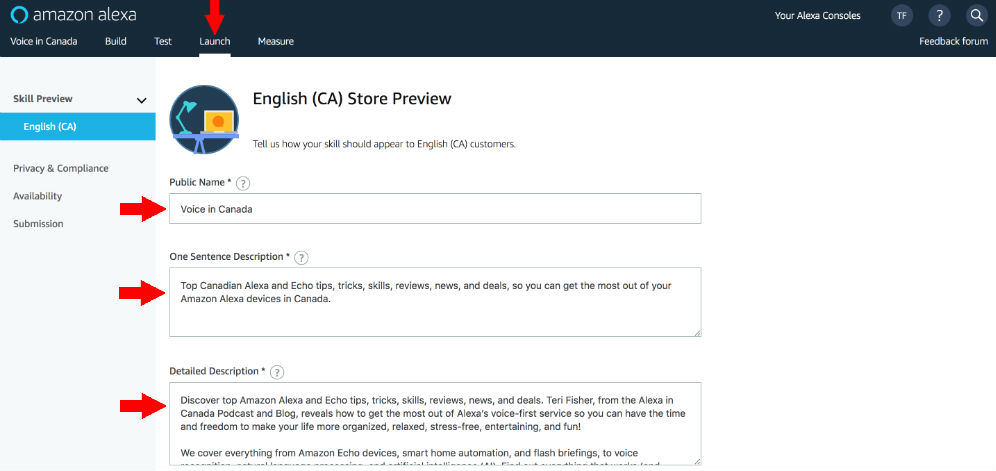
The descriptions and images you provide on the Launch Information page provide the content that displays in the Alexa App. Users can scroll through a list of skills, and select a skill to see more detailed information. The interaction model is already defined so the most important information you provide is a short and long description of your skill, and the images that identify your flash briefing.
- Fill in the Public Name. This is the name of the flash briefing that will be displayed to users in the Alexa app. It can be different from your invocation name, but I suggest keeping it the same. It must be between 2-50 characters.
- Fill in the One Sentence Description. This is a quick, at-a-glance description that describes the flash briefing. This will display in the skill list in the Alexa App. It can be a maximum of 160 characters.
- Fill in the Detailed Description. This is a more comprehensive description of this skill. This description is shown to users on the skill detail card in the Alexa app. If you have multiple feeds, list the different feeds offered here.
- Don’t worry about the Example Phrases. They are automatically set for Flash Briefings and cannot be changed.
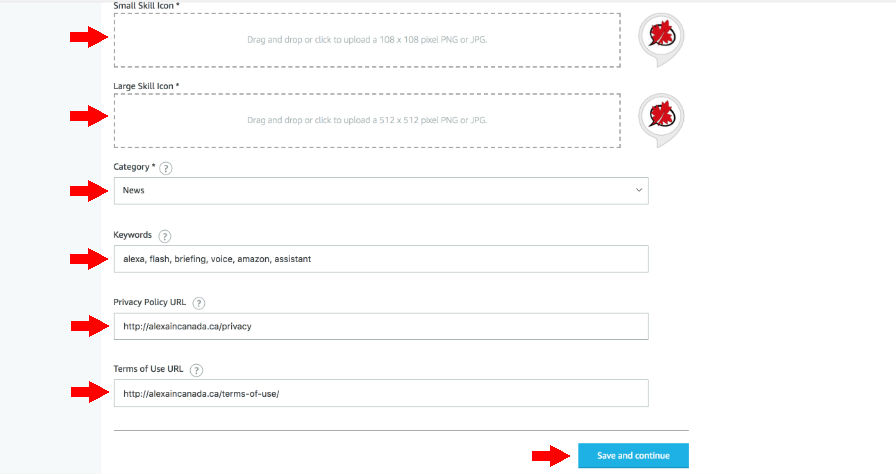
- Upload a Small Skill Icon. This is a 108 x 108 pixel PNG (can include transparency) or JPG file that represents your skill. You can make this the same as your feed icon, just a smaller version. In fact I recommend it, particularly if you only have 1 feed.
- Upload a Large Skill Icon. This is a 512 x 512 pixel PNG (can include transparency) or JPG file that represents your skill. This can be the exact same icon as your feed icon.
- Select a Category from the drop-down box that best describes your flash briefing. This helps users find your skill quickly and easily.
- Optional, but highly recommended: Enter some Keywords, or simple search words that relate to or describe your flash briefing. This helps users to find your flash briefing. Make sure to use spaces or commas between each search term.
- Optional: Enter the link to the Privacy Policy URL that applies to your flash briefing.
- Optional: Enter the link to the Terms of Use URL that applies to your flash briefing.
- Click Save and Continue.
Step 10: Answer the Privacy and Compliance Questions
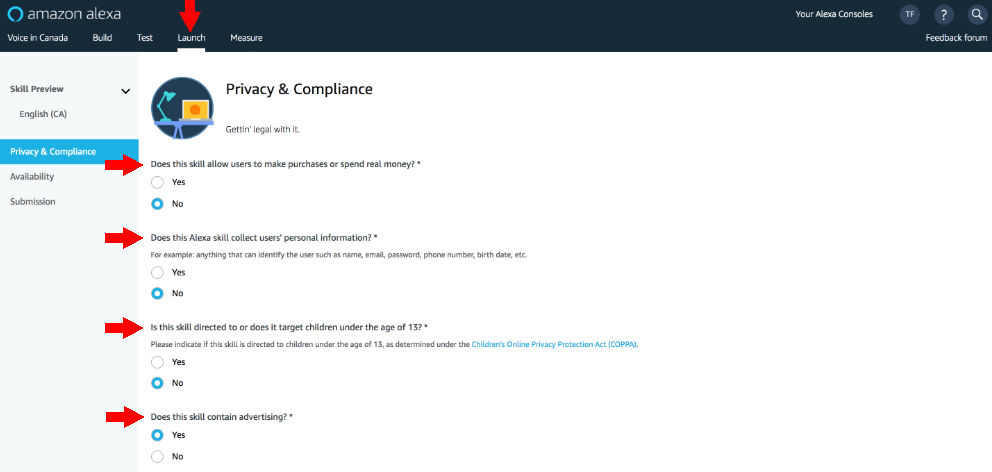
The Privacy and Compliance page lists questions that are required for every skill, including flash briefings. Note that a Flash Briefing skill should NOT enable users to make purchases or ask customers for personal information.
- Answer No to the first question regarding allowing purchases.
- Answer No to the second question regarding collecting personal information.
- Answer the next 2 questions regarding targeting children and advertising as applicable to your particular flash briefing.
- Under Export Compliance, check to certify that your Flash Briefing skill may be imported to and exported from the United States and all countries that Amazon operates. Note: Your flash briefing will only display to customers in countries where the primary language of the country matches the skill language. For example, an English (CA) skill displays in Canada. An English (US) skill displays in other countries (including the US) where English is the primary language.
- Under Testing instructions, simply type ‘None’.
- Click Save and Continue.

Step 11: Set the Availability and Beta Test the Flash Briefing Skill
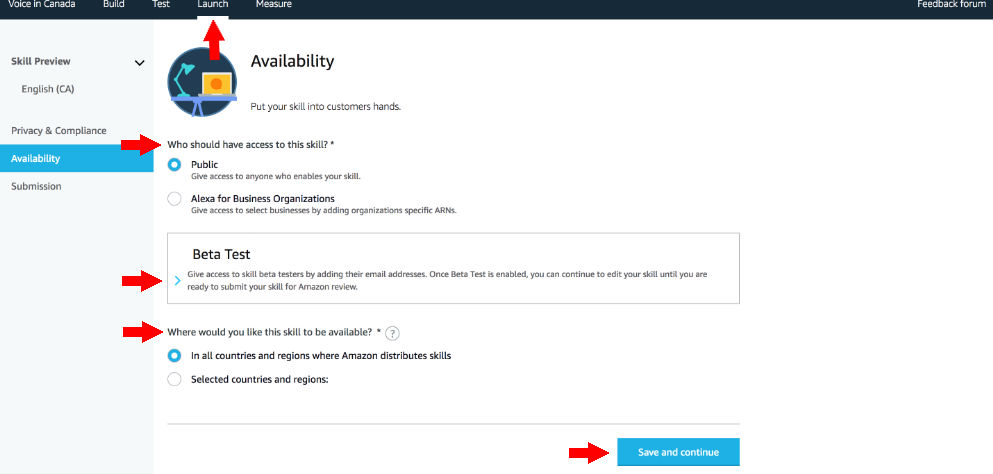
- Answer the question, Who should have access to this skill? Select Public, unless of course you are creating a flash briefing to be used by a particular business.
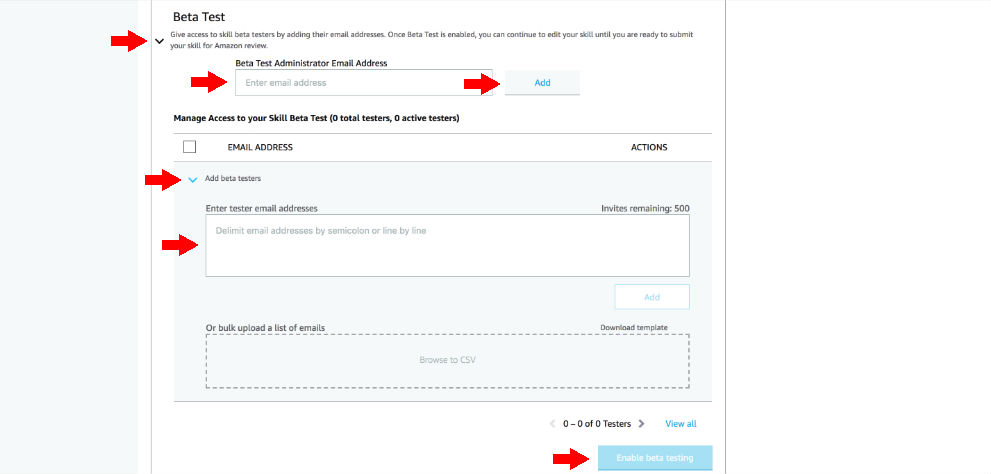
- Optional: Beta Test your flash briefing. Click on the arrow in the beta test box. Enter your email address in the “Beta Test Administrator Email Address” box and then click Add. Then click on the arrow next to “Add Beta testers”, add the email addresses of people that you want to include in the beta test, and then click Add. Finally, click on Enable Beta Testing. Your beta testers will receive an email inviting them to beta test the flash briefing. Make sure to let them know about the beta test and make sure to gather feedback so you can continue to improve your flash briefing.
- Answer the question, Where would you like your skill to be available? I recommend selecting “In all countries…” to make your skill available to users worldwide. Select “Selected countries and regions” to limit the flash briefing to the specified countries. Your flash briefing needs to support the primary language for each of the specified countries to be accessible by users in those countries.
- Click Save and Continue.
Step 12: Perform Final Review and Submit for Certification
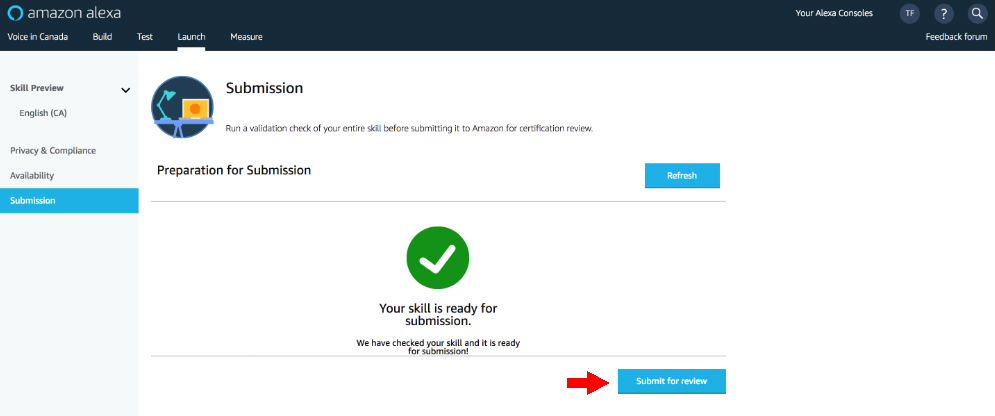
- Check for any flags that indicate that you have forgotten something or are missing an element.
- When everything looks good to go (i.e. you see a nice, big, green checkmark), click Submit for Review.
Step 13: Celebrate!
You’re done! Awesome job! Now sit back, relax, and wait for Amazon to email you back to tell you that the flash briefing is live. Amazon says that this can take up to 5 business days, but in my experience this usually happens within 24 hours. There is a chance that Amazon may reject it for various reasons, but they will always provide feedback if this is the case. It’s usually not a big deal – just fix the issue they identified and then resubmit it! Before you know it, you will have your flash briefing live and your message will be available to the world! Congrats!
Need some Extra Help?
If you follow along with the steps outlined above, you should have all the info and settings that you need to get your flash briefing up and running.
However, if you would like some extra help with the recording, marketing, launching, maintaining and many other aspects of setting up your flash briefing skill, you may be interested in checking out the most comprehensive flash briefing course available: Flash Briefing Formula.
Good luck with your flash briefing!!
List of resources mentioned in this episode:
- Flash Briefing Formula – the most comprehensive Flash Briefing course available
- Pippa.io – use coupon code ‘alexaincanada’ (no quotes) to get a $25 Amazon gift card with an annual plan
- Audio-Technica ATR2100-USB/XLR Cardioid Dynamic Microphone
- NEEWER Adjustable Microphone Suspension Stand
- On Stage MY420 Studio Microphone Shock Mount
- Dragonpad Pop Filter Studio Microphone Wind Screen
- Canva – the recommended easy-t0-use graphic editor to create awesome flash briefing icons
- Music Radio Creative – the best service to create custom audio for your flash briefing
- Audio Jungle – royalty-free music and audio tracks at great prices
Worksheets
- Worksheet 1-4: Flash Briefing Topic
- Worksheet 1-5: Flash Briefing Description
- Worksheet 1-7: Flash Briefing Details
- Worksheet 2-4: Flash Briefing Calls to Action

